You might have seen different methods to remove bloatware from any Android phone, but all those methods either require a PC, your phone needs to be rooted, or some methods use two different Android phones. In today’s post, I’ll show you an excellent way to remove any Android bloatware using a single Android phone.
This method uses two different applications: Shizuku and aShell. I have tested this method on different devices like Xiaomi, Vivo, and Samsung. Let’s go ahead and take a look at a step-by-step guide on how to use these two applications to remove any Android bloatware.
Table of Content
Step 1: Enable Developer Options

Like any other method, the first important step is to enable developer options on your phone. I am using a Samsung device here, so you can go to About Phone, then Software Version, and tap on the Build Number multiple times until you get a banner message saying that you are a developer now. You can then go back, open Developer Options, enable USB Debugging first and then enable Wireless Debugging as well. Please do not worry about any pop-ups here, just allow all of them.
Step 2: Setting Up Shizuku
Step number two is very important, so please make sure you pay attention so that you do not miss any important steps here. I also wanted to let you guys know that I won’t be going into detail about the application features because that’s going to make this post very long. To make things a bit short, both Shizuku and aShell are open-source applications capable of doing some really powerful things on Android devices.
Shizuku – Download
aShell (F-Droid) – Download
aShell (GitLab) – Download
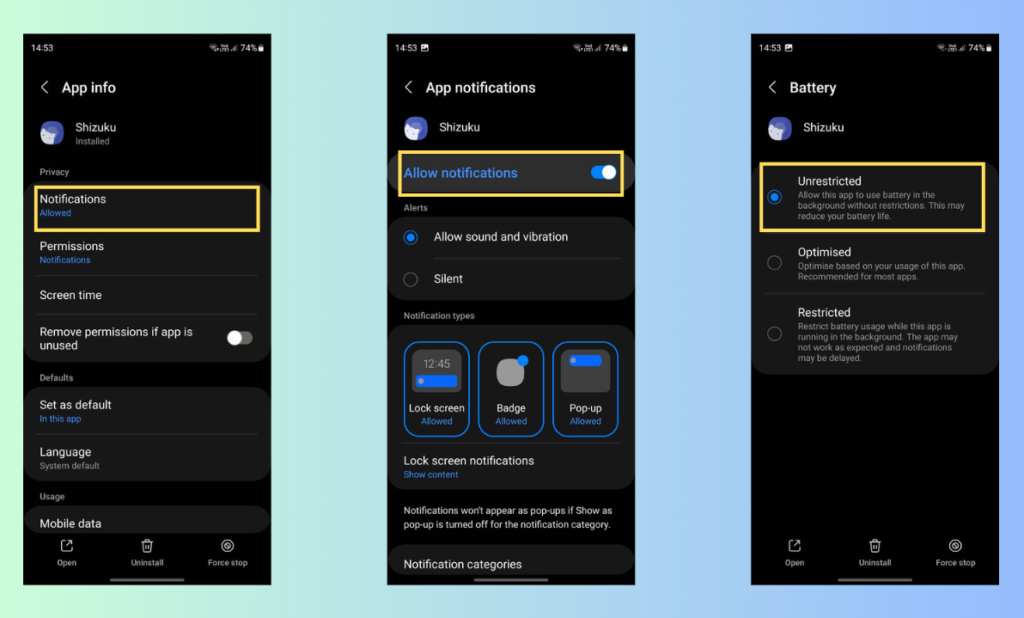
Setting up Shizuku is a bit complicated, and I will try my best to make things easier. After downloading Shizuku on your phone, the first thing is to enable notification permissions.

Just long press on the application and go to application information and turn on notifications.
While you are in this information page, remove all the battery restrictions so that the Android system does not kill this application in the background. In some devices like Xiaomi, you will get an option of autostart right here, and it is better to enable autostart as well to avoid any unnecessary issues. These settings might be different for different devices, so please make sure you follow all the steps carefully before moving any further.
After you are done with all these steps, you can go ahead and open Shizuku. Please do not worry about any extra features here. We are just going to use a few of them.

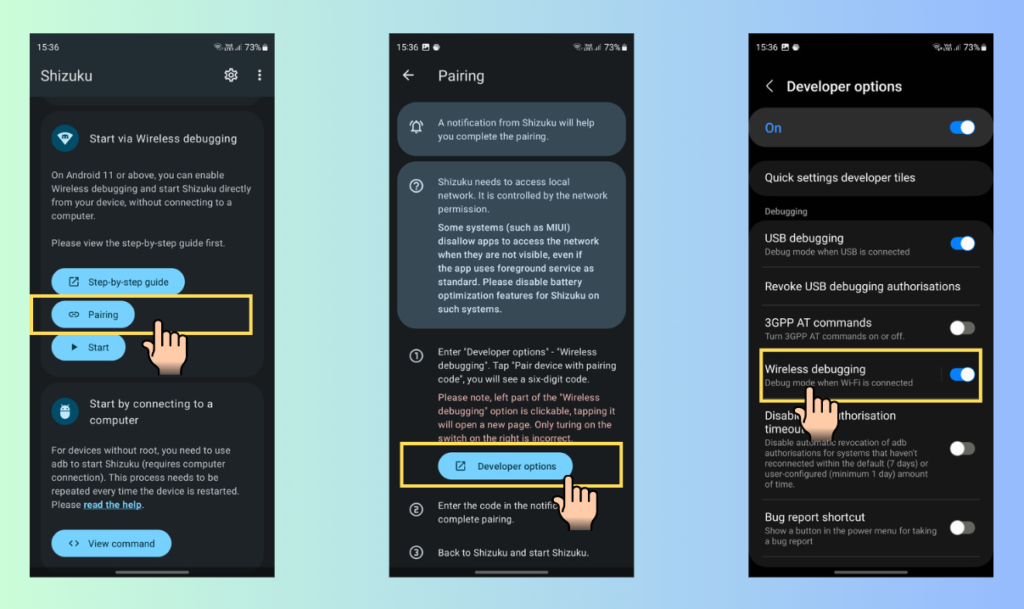
Now we need to pair the device with Shizuku, so please go ahead and tap on pairing. It will ask you to open Developer Options, tap on Developer Options, and search for Wireless Debugging, which should be turned on as I mentioned at the beginning of this post. If you take a closer look, the left side of Wireless Debugging is clickable, so you can just tap on it and you will see an option of connecting through a pairing code.

Just tap on connect through a pairing code and you should get a code here along with a notification from Shizuku about entering the code. Please enter the code and tap on the send button. The connection should be successful and if you go back and open Shizuku, it should get automatically connected.
Please note that it is a very tricky process and you need to have some patience because all the steps I mentioned here look very easy actually, but they are not and there is a high chance that you might face some issues along the way and Shizuku might not get connected to your phone, so you have to perform troubleshooting.
If the application does not get connected, try to disable Wireless Debugging and then enable it again. If you are using a Xiaomi phone, you already know how bad it is going to be because Xiaomi does not want you to move away from MIUI or do any kind of modifications. You can also try the user guide that Shizuku developers have provided and it is very easy to read and follow.
Step 3: Using aShell
Now Shizuku is connected, you have to open the second application called aShell. As soon as you open this application, it will ask for Shizuku’s permission, please enable it first. There you have a first look at the application interface. Now this application is very interesting, you will get ready-made commands for different functions. As we are dealing with Android bloatware, we will just concentrate on those particular commands.

If you type pm uninstall in the search bar, you will get a set of different commands here and you can try any of them depending on your device. As I am using a Samsung phone here, I will select the command that works here. If you know the package name, just type it or get the package name of any application using Package Name Viewer 2.0, which is available for free on the Google Play Store.

Once you get the package name, type it and tap enter and the application is going to be removed from your phone. You can also try other commands to freeze or disable the applications and it is super easy. After you are done with all this, you can delete both these applications.
If you want to do some more research, you can take a look at other powerful features of Shizuku because there is a huge list of open-source applications that work with Shizuku. I’ll place a link to a GitHub article that contains a well-defined list of open-source applications that’s going to make your Android experience much better.
The information I shared in this post is just very small. If you want to unleash the complete power of Shizuku, I highly recommend checking this GitHub article and I’m sure you’re not going to regret it.
That’s all for today’s post and I hope I was able to make things a bit easier here. If you have any questions or queries, you can drop a comment.
